Below are some guidelines to get the best recording quality possible. Although they are quite basic, by following them carefully to begin with, they will soon become well-engrained habits. As Lingopolo is entirely based around the recordings, it is essential that they are as good as reasonably possible.
Use the Audacity program to view and later edit sound recordings.
a) Ensure that as far as possible there is no background noise of any type, including electrical interference
There can be many causes of noise; cars, people talking out on the street, or electrical interference.
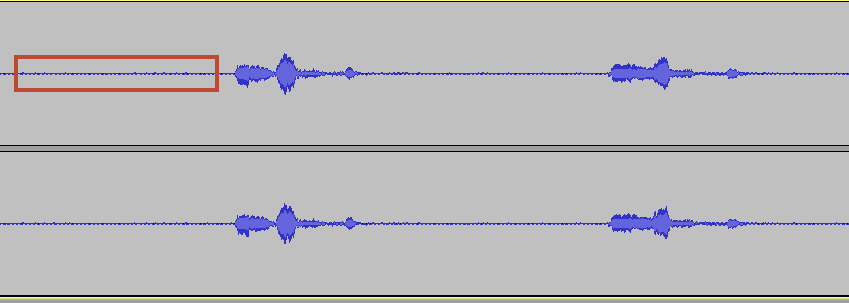
The following image shows a bad recording, as there is constant electrical intereference visible.
The aim is to have a recording where the noise is non-existent to the naked eye, or almost non-existent.
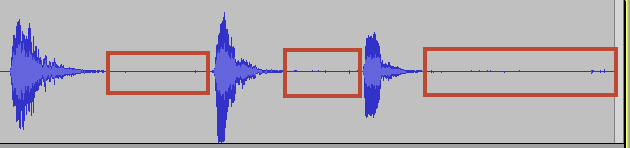
The following image shows a good quality recording, since the gaps between the words are almost totally silent, and the few times that there are some noises, the actual size of the noise is very small.
b) Ensure that the volume of the recording is high, but without shouting
The first point was about reducing the noise to the minimum, the second point is about making sure that the actual desired voice recording which is wanted is at the maximum. This does not mean shouting, but it does mean speaking loudly enough so that there is a good volume of sound recorded. Recordings should be at least above 0.5 on the Audacity scale. This is so that you don't have to amplify the recording too much (because all amplification results in a degree of distortion, so the less you need to amplify the better).
If you are recording yourself, your aim should be to make the recording peak between 0.9 and 1.0 (but never touching or above 1.0, since that itself causes sound distortion).
In the following stages, there will be two things done: the individual recordings will be "noise removed" and "normalised".
The noise removal process will distort the sound slightly downwards and so it's important that the difference between the noise and the required voice is a large as possible (i.e. a large signal to noise ratio).
The normalisation process is so that all the recordings on Lingopolo sound like they have more or less the same volume. The way that this will later be done is to amplify each individual recording so that the highest (or lowest) volume is 1.0 (or -1.0) in Audacity. The smaller the volume on the original recordings, the greater the artificial amplification will later have to be, and so also the increase in sound distortion. This is why it is important that the original recordings are naturally as close to the required degree of loudness as possible, so that the later amplification will be as small as possible.
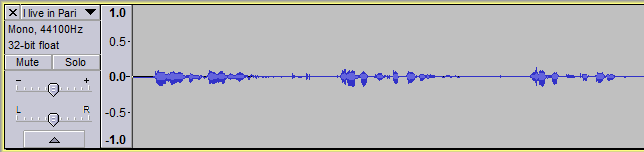
The following shows an example of a poor recording level; it is too quiet, with the maximum amplitude being around 0.1 or 0.2 on the Audacity scale. This will mean it will have to be magnified by 5 or more when normalised.
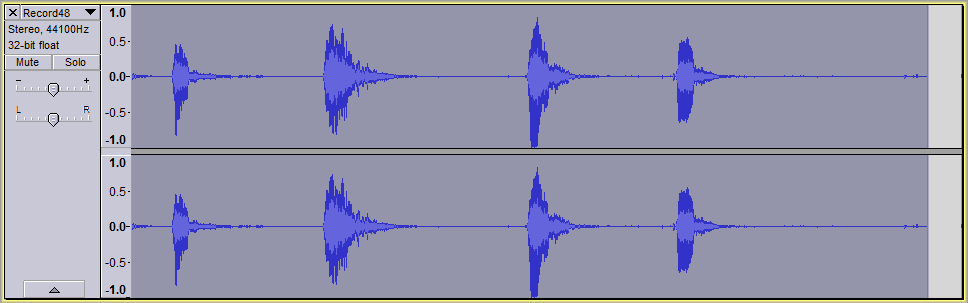
The following shows an example of a good recording level. You will see here that the recordings are generally all filling quite comfortably the space, and all at least above 0.5 on the Audacity scale:
It takes a while to get the hang of speaking loudly and clearly, but not shouting. Practise will make perfect!
c) Beware the position of the microphone, particularly for sounds like "p"
There are certain sounds like the English "p" in "paper" which microphones are particularly likely to pick up too strongly, because they over react to the large puff of air if you speak directly into the microphone. To avoid this, speak closely to the microphone, but not directly into it.